How to Use Google Drawings

Google Drawings is an app that allows users to create shapes, flow charts, concept maps, and many other types of graphic organizers and diagrams. The advantage of Google Drawings over other graphic organizer software and apps is that Google Drawings is collaborative. You can create a worksheet in Google Drawings and immediately share it with a colleague for feedback; any changes made will automatically be saved. Google Drawings can also be used by students as they work together and collaborate on an assignment. Additionally, any drawings you create can be easily inserted into other Google documents, spreadsheets, or presentations.
Getting Started with Google Drawings
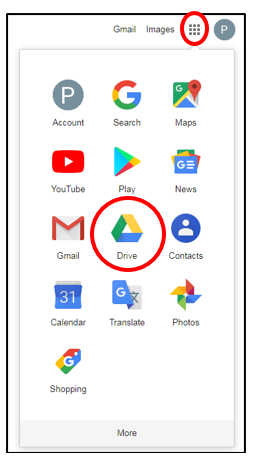
To get started with Google Drawings, you must be logged into your Google account. Then select Drive from the list of options. Note that your Drive icon may be in a different place on the menu.
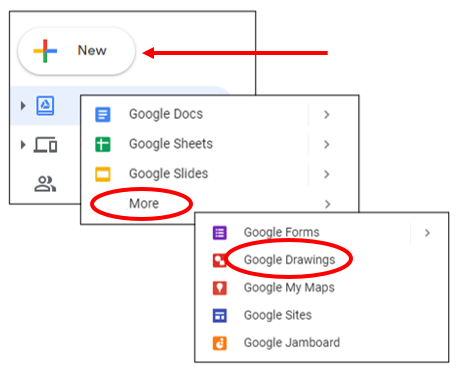
To get to Drawings, click on New, then More, and select Google Drawings.
Adding Lines and Shapes
Google Drawings has made it incredibly easy to add lines and shapes to a drawing. Start by creating a simple line.
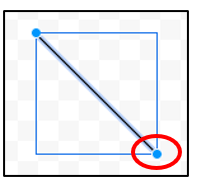
- Click on the Line icon.
- Click on any empty space on the canvas. A line immediately appears on the grid. Alternatively, after clicking the Line icon, you can click and drag the mouse on the canvas to create a line.
- To resize the line, click and hold one end of the line and drag. Release the mouse when you have the desired size. To change the angle of the line, click and hold one end of the line and move the mouse up and down. Release the mouse when you have the desired angle.
- Notice that when the line is selected, more formatting options appear in the toolbar. You can change the line color, line weight, and how the line starts and ends. You can also add a hyperlink or a comment to the line. There are also additional formatting options on the right-hand panel when you click on Format options.
- Be sure to take a moment to explore the various types of lines Google Drawings offers by clicking the dropdown arrow right next to the Line icon.


Now, try creating a rectangle.
- Click on the Shape icon.
- A dropdown menu appears showing the different shape options Google Drawings offers.
- To create a rectangle, click on the arrow next to Shapes. Then, click on the rectangle shape.
- Click on any empty space on the canvas. A rectangle immediately appears on the grid.
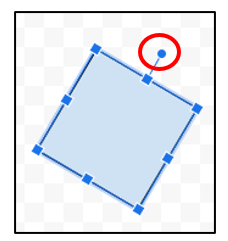
- To resize the rectangle, click and hold one of the blue resizing dots and drag to adjust the height and width. Let go of the mouse when you have the desired size.
- Notice a small circle extended above the rectangle. This tool allows you to rotate the shape in any direction.
- Select the rectangle for more formatting options. Use the Color fill tool to change the color of the shape. You can also add text by clicking inside the shape and typing. The text can be modified using common text formatting options such as font size, color, styles, and indentations. It takes no time at all to add lines and shapes to your drawing. Just think of all the different graphic organizers, flowcharts, and worksheets you can create!


Adding Text Boxes
In addition to lines and shapes, you can also add text boxes and word art to a drawing.
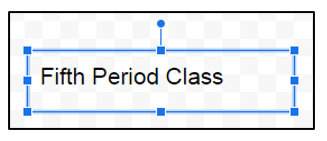
First, let’s start by adding text.
- Click on the Text icon.
- Just like drawing a rectangle, click and drag the mouse to create a box. When you are happy with the size of the text box, release the mouse button. A text box immediately appears on the grid.
- The cursor is already placed inside the text box so you can immediately begin typing. Use the common text formatting options to change the font size, color, styles, and indentation of the text.

Adding Images
You can easily add images to a drawing from the Internet, your computer, or Google Drive.
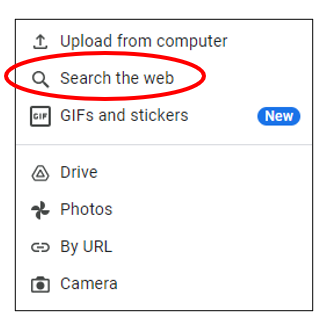
- Click on the Image icon.
- A dropdown menu appears with different options you can choose to insert an image. If you already have an image saved onto your computer, Google Drive, or Google Photos, choose those options to locate your image and add it to the drawing. However, if you want to search for an image on Google Images, you can do so right in the Drawings app. Click on Search the web.
- A Google search box appears on the right-hand side of the screen.
- Search for the image you want. Once you find an image you like, click on the image to select it. The blue bar at the bottom of the screen shows that you have one image selected. Click Insert. The image you selected is now in your drawing.


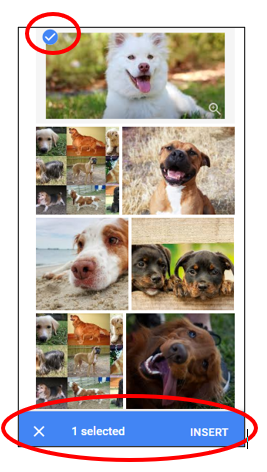
As you can see, it is very easy to insert a picture into a drawing. Use the Image tool to add text to explain or annotate the image.
Google Drawings makes it possible to create graphics quickly and easily for both students and teachers.
Are you curious? Want to take a deep dive on this topic?
To learn more about how to use various Google apps in your classroom for teaching and learning, visit the Professional Development Institute (PDI) website or go directly to our Google as a Classroom Tool for Learning course.
PDI has been offering quality online professional development courses for over 25 years and has trained more than 345,000 K-12 educators across the globe. We specialize in offering quality, affordable university-approved online courses that focus on the most relevant topics in education while providing practical strategies that can be implemented in the classroom immediately. All PDI courses are at the graduate-level, instructor-led, and are conducted entirely online. University credit is available through University of California Division of Extended Studies. PDI offers an extensive catalog of online courses for teachers on topics that are the most critical in today’s classrooms.
Categories: technology skills, Google

View PDI's Catalog of Courses
Check out a list of all PDI graduate-level online courses or sort by grade level or subject area.

Register Now!
Quick access to register for PDI's online courses using our secure system.

Learn More about PDI
Find out how to reach PDI and get answers to any questions you may have.

Access My Course
Access PDI's online learning management system to begin your course.